
دانلود درایور مودم D-Link DSL 2520u

درباره سایت
آخرین مطالب
- windows kms digiboy
- پاک کردن درایور پرینتر در ویندوز
- روش قطعی رفع ارور 0x0000011b پرینتر
- آموزش غیر فعال سازی فایروال
- فایروال ویندوز چیست و آموزش تنظیمات Windows Firewall
- مشکل جدید در نصب بروزرسانیهای ویندوز
- عدم اتصال به vpn سازمانی
- How to Install an M.2 SSD in the Lenovo ThinkPad T440s
- Installing snap on Rocky Linux
- How to Start, Stop or Restart Network Services on Rocky Linux 8
امکانات وب
 windows kms digiboy سه شنبه بیستم شهریور ۱۴۰۳ 22:42 slmgr /skms kms.digiboy.ir slmgr /ato مهندس چراغی بیوگرافی رفع ایراد سیستم و شبکه های کامپیوتری ، برقراری امنیت و نیز عرضه تمامی تجهیزات مربوط به آنها آخرین نوشتهها دانلود نرم افزار انی دسک روش فعال سازی ویندوز روش فعال سازی آفیس افزونه کروم نماینده فروشرسانی و پشتیبان ADSL پیشگامان آدرس کانال مدیر ده نکته برای محافظت از چشم هنگام کار زیاد با کامپیوتر عدم اتصال به vpn سازماني مشکل نوین در نصب بروزرسانی
برچسب:
نویسنده: مهسا حکیمی
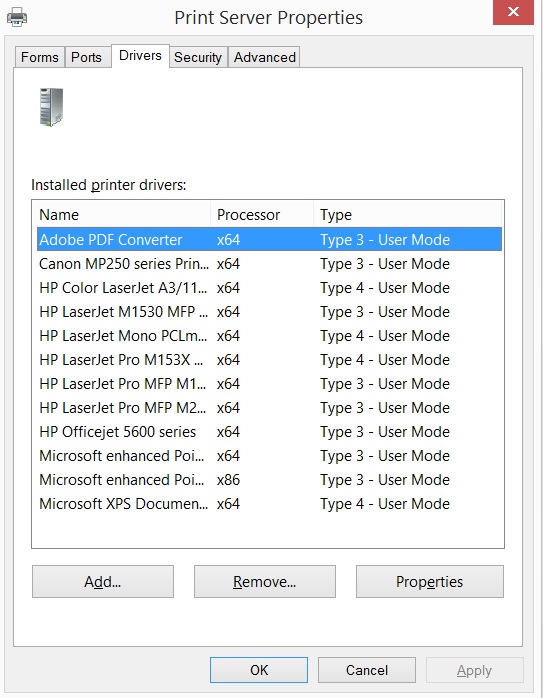 1- پنجره Run را باز کنید. از ترکیب کلید پنجره + R بر روی کیبورد برای این کار میتوانید استفاده کنید. برای مشاهده کلیدهای میانبر مفید در ویندوز میتوانید به مقاله شورتکات های مهم ویندوز مراجعه نمایید.2- در پنجره باز شده عبارت printui /s /t2 را تایپ کنید.
3- در اینجا لیست جامع مربوط به درایور پرینترهایی که بر روی این ویندوز نصب شده است را میتوانید ملاحظه کنید. درایور مورد نظر را انتخاب کرده و بر روی کلید Remove کلیک کنید.اگر پیغام delete unsuccessful را دریافت کردید مراحل زیر را دنبال کنید: C:W
1- پنجره Run را باز کنید. از ترکیب کلید پنجره + R بر روی کیبورد برای این کار میتوانید استفاده کنید. برای مشاهده کلیدهای میانبر مفید در ویندوز میتوانید به مقاله شورتکات های مهم ویندوز مراجعه نمایید.2- در پنجره باز شده عبارت printui /s /t2 را تایپ کنید.
3- در اینجا لیست جامع مربوط به درایور پرینترهایی که بر روی این ویندوز نصب شده است را میتوانید ملاحظه کنید. درایور مورد نظر را انتخاب کرده و بر روی کلید Remove کلیک کنید.اگر پیغام delete unsuccessful را دریافت کردید مراحل زیر را دنبال کنید: C:W
برچسب:
نویسنده: مهسا حکیمی
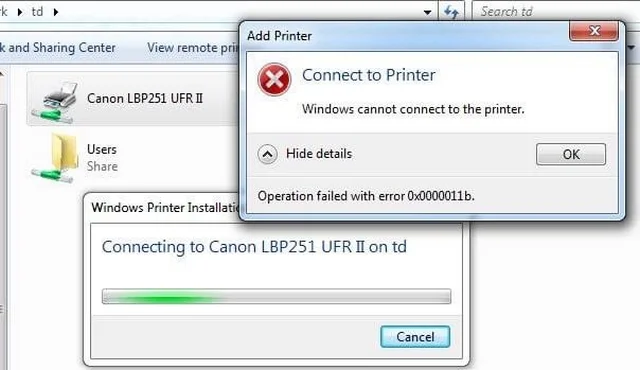 نحوه رفع خطای ویندوز نمی تواند به چاپگر متصل شود – عملیات با خطای 0x0000011B انجام نشداگر به کامپیوتری که پرینتر بر روی آن نصب هست یا همان سرور در اینجا دسترسی دارید مستقیما مرحله تنظیم رجیستری را انجام دهید و مشکل را برطرف کنید.
آموزش جامع نصب پرینتر1) مراحل برای کامپیوتر میزبان یا سرورتمام این مراحل باید در رایانه ای که چاپگر در آن نصب شده است انجام شود.” رجیستری” را در کادر جستجوی نوار وظیفه تایپ کنید و در نتایج جستجو بر روی ” Registry Editor “ کلیک کنید.آموزش جامع روش قطعی رفع ارور 0x000007
نحوه رفع خطای ویندوز نمی تواند به چاپگر متصل شود – عملیات با خطای 0x0000011B انجام نشداگر به کامپیوتری که پرینتر بر روی آن نصب هست یا همان سرور در اینجا دسترسی دارید مستقیما مرحله تنظیم رجیستری را انجام دهید و مشکل را برطرف کنید.
آموزش جامع نصب پرینتر1) مراحل برای کامپیوتر میزبان یا سرورتمام این مراحل باید در رایانه ای که چاپگر در آن نصب شده است انجام شود.” رجیستری” را در کادر جستجوی نوار وظیفه تایپ کنید و در نتایج جستجو بر روی ” Registry Editor “ کلیک کنید.آموزش جامع روش قطعی رفع ارور 0x000007
برچسب:
نویسنده: مهسا حکیمی
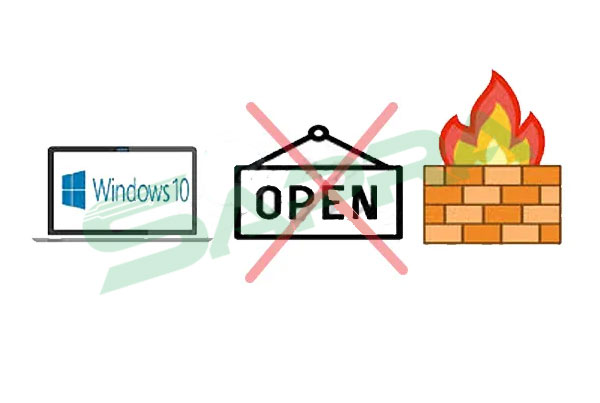 غیر فعال سازی فایروال در ویندوز به یکی از سه روش زیر انجام میشود:پیش از آنکه از طریق یکی از روشهای فوق اقدام به خاموش کردن فایروال ویندوز خود کنید، لازم است یک بار دیگر مرور کنیم که فایروال در حقیقت نرمافزار یا سختافزاری است که نظارت بر شبکه و اینترنت را برعهده دارد تا مانع از ورود و نفوذ افراد بدون مجوز به سیستم شما شود . فایروال مانند یک سد امنیتی در ویندوز است که با ارزیابی دیتای ورودی /خروجی مانع از بروز مشکل در سیستم میگردد. بنابراین لازم است که همواره فایروال سیستم شما روشن باشد و ت
برچسب:
نویسنده: مهسا حکیمی
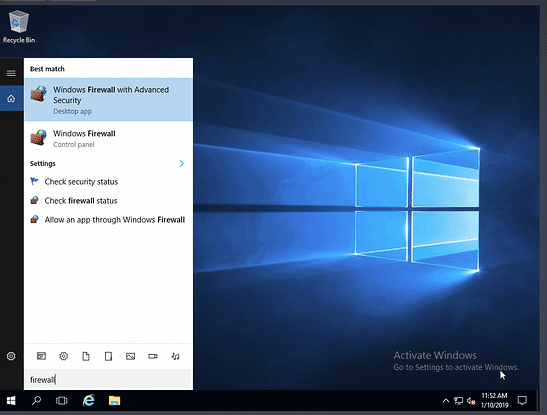 فهرست این مقاله ( با کلیک روی هر عنوان به آن قسمت منتقل می شوید) پنهان فایروال ویندوز یا windows firewall چیست؟
نحوه دسترسی به فایروال ویندوز چگونه است ؟فعال کردن فایروال ویندوز (چگونه windows firewall را روشن کنیم)غیر فعال کردن فایروال ویندوز ( چگونه windows firewall را خاموش کنیم)نحوه قرار دادن برنامه در فایروال ویندوزپروفایل Windows Firewall چیستFirewall یا دیوار آتش یک سخت افزار یا یک نرم افزار نصب شده در کامپیوتر است. فایروال مجموعهای از قوانین را در خود دارد که تعیین کننده این محور هستند
فهرست این مقاله ( با کلیک روی هر عنوان به آن قسمت منتقل می شوید) پنهان فایروال ویندوز یا windows firewall چیست؟
نحوه دسترسی به فایروال ویندوز چگونه است ؟فعال کردن فایروال ویندوز (چگونه windows firewall را روشن کنیم)غیر فعال کردن فایروال ویندوز ( چگونه windows firewall را خاموش کنیم)نحوه قرار دادن برنامه در فایروال ویندوزپروفایل Windows Firewall چیستFirewall یا دیوار آتش یک سخت افزار یا یک نرم افزار نصب شده در کامپیوتر است. فایروال مجموعهای از قوانین را در خود دارد که تعیین کننده این محور هستند
برچسب:
نویسنده: مهسا حکیمی
مایکروسافت شرح داده است که مشکل چیست و چه چیزی باعث آن میشود:علائم: شما دستگاهی دارید که آخرین بروزرسانی تجمعی نقطه تحلیل نصب شده است (به عنوان مثال، اکنون بروزرسانی مورد نیاز سپتامبر 2024، KB5043080). از سوی دیگر یک خصوصیت درخواستی (FoD) یا بسته زبانی (LP) را از یک منبع محلی نصب کردهاید در حالی که هیچ ارتباطی با Windows Update (WU) یا Windows Server Update Services (WSUS) وجود ندارد. سپس اگر سعی کنید با دوبار کلیک کردن روی بسته .msu، یک بروزرسانی تجمعی پس از نقطه تحلیل را نصب کنید، ممکن است ن
برچسب:
نویسنده: مهسا حکیمی
عدم اتصال به vpn سازماني دوشنبه یکم اردیبهشت ۱۴۰۴ 14:41 https://tosinso.com/questions/70305/%D8%B9%D8%AF%D9%85-%D8%A7%D8%AA%D8%B5%D8%A7%D9%84-%D8%A8%D9%87-vpn-%D8%B3%D8%A7%D8%B2%D9%85%D8%A7%D9%86%D9%8Ahttps://godping.ir/amoozesh/%D8%AD%D9%84-%D8%A7%D8%B1%D9%88%D8%B1-%D9%87%D8%A7%DB%8C-%D8%B1%D8%A7%DB%8C%D8%AC-%D8%AF%D8%B1-%DA%A9%D8%A7%D9%86%DA%A9%D8%B4%D9%86-%D8%A7%D8%AA%D8%B5%D8%A7%D9%84-%D8%A8%D9%87-%D8%B3%D8%B1%D9%88/ مهندس چراغی بیوگرافی رفع ایراد سیستم و شبکه های کامپیو
برچسب:
نویسنده: مهسا حکیمی
 Before You BeginIf your ThinkPad T440s has a built-in 3G/4G modem, then the M.2 slot is already occupied and you can't perform this upgrade. If you don't have a modem, but do have a hard drive, you may have a small, 16GB Flash cache chip in the M.2 slot, and you'll need to remove it as part of the installation process. When buying an SSD, be sure to purchase an M.2 drive that is exactly 42mm long, the only length that will fit in the ThinkPad T440s's narrow slot. Though M.2 is the next-generation of mSATA, it is not backward compatible so you need to make sure the drive is listed as M.2, not mSATA. We used a MyDigitalSSD 128GB drive, which costs $79.99 (Buy at Amazon (opens in new tab)), but you can also find 64GB or 256GB drives for more or less money. We recommend going with at least 128GB (see our favorite SSDs here). You'll also need a small Philips-head screwdriver.MORE: How to Upgrade the RAM on the Lenovo ThinkPad T440sRECOMMENDED VIDEOS FOR YOU...How to Install an M.2 SSD in the T440s 1. Enter the BIOS setup program by hitting Enter repeatedly when the notebook boots. If Windows loads, you'll have to restart and try again.2. Select Power under the Config Tab.3. Select Disable Built-in Battery and hit yes when asked to confirm. This will tu the computer off.4. Place the T440s upside down on a table, with the power off and cord unplugged.5. Remove the battery by pulling aside the clips. 6. Unscrew the 8 screws on the back using the Philips head screwdriver. 7. Pry the
برچسب:
نویسنده: مهسا حکیمی
 Snap is available for Rocky Linux 8, a Linux distribution that’s being actively developed to provide binary compatibility with Red Hat Enterprise Linux (RHEL).See also Installing snap on Red Hat Enterprise Linux.The snap packages for Rocky Linux can be found in the Extra Packages for Enterprise Linux (EPEL) repository. The EPEL repository can be added to a Rocky Linux system with the following command:$ sudo dnf install epel-release
$ sudo dnf upgrade
If you use a root user rather than sudo to handle security privileges, run su first and remove sudo from subsequent commands. If you’re interested in understanding how these packages are built, see Building a snap RPM for Red Hat Enterprise Linux (RHEL) 8.Installing snapdWith the EPEL repository added to your Rocky Linux installation, simply install the snapd package (as root/or with sudo):$ sudo yum install snapd
Once installed, the systemd unit that manages the main snap communication socket needs to be enabled:$ sudo systemctl enable --now snapd.socket
To enable classic snap support, enter the following to create a symbolic link between /var/lib/snapd/snap and /snap:$ sudo ln -s /var/lib/snapd/snap /snap
Either log out and back in again or restart your system to ensure snap’s paths are updated correctly.Snap is now installed and ready to go! If you’re using a desktop, a great next step is to install the Snap Store app.source
Snap is available for Rocky Linux 8, a Linux distribution that’s being actively developed to provide binary compatibility with Red Hat Enterprise Linux (RHEL).See also Installing snap on Red Hat Enterprise Linux.The snap packages for Rocky Linux can be found in the Extra Packages for Enterprise Linux (EPEL) repository. The EPEL repository can be added to a Rocky Linux system with the following command:$ sudo dnf install epel-release
$ sudo dnf upgrade
If you use a root user rather than sudo to handle security privileges, run su first and remove sudo from subsequent commands. If you’re interested in understanding how these packages are built, see Building a snap RPM for Red Hat Enterprise Linux (RHEL) 8.Installing snapdWith the EPEL repository added to your Rocky Linux installation, simply install the snapd package (as root/or with sudo):$ sudo yum install snapd
Once installed, the systemd unit that manages the main snap communication socket needs to be enabled:$ sudo systemctl enable --now snapd.socket
To enable classic snap support, enter the following to create a symbolic link between /var/lib/snapd/snap and /snap:$ sudo ln -s /var/lib/snapd/snap /snap
Either log out and back in again or restart your system to ensure snap’s paths are updated correctly.Snap is now installed and ready to go! If you’re using a desktop, a great next step is to install the Snap Store app.source
برچسب:
نویسنده: مهسا حکیمی
 Steps to start, stop and restart the network serviceOpen the terminal window on your system and run the ‘su’ command on the terminal to log in as the root user.There are the following two ways through which you can start, stop or restart network service:Use of NetworkManager serviceUse of nmcli toolNow, we will explore each way one by one in the following tutorial:Use of NetworkManager serviceTo start a network service on the RockyLinux 8, you will run the below-given command:$sudo systemctl start NetworkManager.serviceThe above-mentioned command is used to start a network service on RockyLinux 8.To stop a network service on the RockyLinux 8, you need to run the below-mentioned command:$sudo systemctl stop NetworkManager.serviceTo restart a network service, you need to execute the following command:$sudo systemctl restart NetworkManager.serviceUse of nmcli toolThe nmcli is a tool or utility that is used for managing the NetworkManager services through the terminal.Note: Before starting to use nmcli utility, it is noted that do not try to execute ‘$nmcli networking off’ for those systems that are coected remotely with others. This command will stop or disable the NetworkManager settings and you will discoect from the network coection.To tu on the network services, you will type the following command on the terminal in RockyLinux 8.$sudo nmcli networking onTo stop or tu off the network services, you will execute the following command on the terminal.$sudo nmcli networ
برچسب:
نویسنده: مهسا حکیمی
 Different methods to disable IPv6First, let's check that ipv6 is enabled:[foc@rocky9 ~]$ ip a
2: enp1s0: mtu 1500 qdisc fq_codel state UP group default qlen 1000
link/ether 52:54:00:01:bc:2a brd ff:ff:ff:ff:ff:ff
inet 192.168.122.238/24 brd 192.168.122.255 scope global dynamic noprefixroute enp1s0
valid_lft 2273sec preferred_lft 2273sec
inet6 fe80::5054:ff:fe01:bc2a/64 scope link noprefixroute
valid_lft forever preferred_lft forever
The information expressed with inet6 in the output we get with the ip command belongs to ipv6. Let's look with sysctl command:[foc@rocky9 ~]$ sysctl -a | grep -i ipv6
net.ipv6.auto_flowlabels = 1
net.ipv6.bindv6only = 0
net.ipv6.calipso_cache_bucket_size = 10
net.ipv6.calipso_cache_enable = 1
net.ipv6.conf.all.accept_dad = 0
...Many values of ipv6 are displayed in the output. This indicates that ipv6 is enabled on the system.ALSO READ:How to install EPEL Repository Rocky Linux? [SOLVED]Method-1: Disable IPv6 with GUIIf you are using a server with a GUI, you can lea how to disable ipv6 in this step. Go to ipv6 settings in Settings > Network > Wired > IPv6. Then you can disable ipv6 with Disable > Apply.Activate the changes by tuing the network on/off.You have simply and successfully disabled ipv6 from the GUI.Method-2: Disable IPv6 with nmtuiThere are several alteatives to disable ipv6 from the terminal screen. One of them is nmtui. Invoke nmtui with sudo in terminal:Advertisement[foc@rocky9 ~]$ sudo nm
Different methods to disable IPv6First, let's check that ipv6 is enabled:[foc@rocky9 ~]$ ip a
2: enp1s0: mtu 1500 qdisc fq_codel state UP group default qlen 1000
link/ether 52:54:00:01:bc:2a brd ff:ff:ff:ff:ff:ff
inet 192.168.122.238/24 brd 192.168.122.255 scope global dynamic noprefixroute enp1s0
valid_lft 2273sec preferred_lft 2273sec
inet6 fe80::5054:ff:fe01:bc2a/64 scope link noprefixroute
valid_lft forever preferred_lft forever
The information expressed with inet6 in the output we get with the ip command belongs to ipv6. Let's look with sysctl command:[foc@rocky9 ~]$ sysctl -a | grep -i ipv6
net.ipv6.auto_flowlabels = 1
net.ipv6.bindv6only = 0
net.ipv6.calipso_cache_bucket_size = 10
net.ipv6.calipso_cache_enable = 1
net.ipv6.conf.all.accept_dad = 0
...Many values of ipv6 are displayed in the output. This indicates that ipv6 is enabled on the system.ALSO READ:How to install EPEL Repository Rocky Linux? [SOLVED]Method-1: Disable IPv6 with GUIIf you are using a server with a GUI, you can lea how to disable ipv6 in this step. Go to ipv6 settings in Settings > Network > Wired > IPv6. Then you can disable ipv6 with Disable > Apply.Activate the changes by tuing the network on/off.You have simply and successfully disabled ipv6 from the GUI.Method-2: Disable IPv6 with nmtuiThere are several alteatives to disable ipv6 from the terminal screen. One of them is nmtui. Invoke nmtui with sudo in terminal:Advertisement[foc@rocky9 ~]$ sudo nm
برچسب:
نویسنده: مهسا حکیمی
اتصال از طریق Power CLIبرای بکاپ گیری از دستور زیر استفاده می کنیم:Get-VMHostFirmware -VMHost 10.10.10.10 -BackupConfiguration -DestinationPath C:Downloads
Set-VMHost -VMHost 10.10.10.10 -State 'Maintenance'
نکته: دقت کنید که حتما قبل از بکاپ گرفتن همه ماشین ها خاموش باشند، در غیر این صورت پیغام خطا برای شما نمایش داده میشه و به شما اجازه بکاپ گرفتن داده نمیشه. ، برای بازگردانی بکاپ هم اول باید هاست رو به حالت Maintenance ببرید و بعد اقدام به بازگردانی کنید.دستور مربوط به بازگردانی هم به شکل زیر اجرا میشه.Set-VMHostFirmware -VMHost 10.10.10.10 -Restore -SourcePath c:bundleToRestore.tgz -HostUser root -HostPassword exampleRootPassword
اتصال از طریق Esxi Command LineSSH رو روی هاست فعال کنید. (Configuration -> Security Profile) با ابزارهایی مثل Putty به هاست متصل بشید و مطمئن بشید که همه ماشین های هاست خاموش باشند.برای پشتیبان گیری از دستور زیر استفاده کنید.vim-cmd hostsvc/firmware/sync_config
vim-cmd hostsvc/firmware/backup_config
در این مرحله مسیری به شما نمایش داده میضشه که از طریق اون می تونید فایل رو دانلود و در محل دلخواه ذخیره کنید.دقت کنید که نام فایل رو به ConfigBundle.tgz تغییر بدید تا وقتی که تصمیم دارید بکاپ رو بازگردانی کنید به مشکل بر نخورید. برای بازگردانی بکاپ باید فایل رو توی مسیر /tmp که توی هاست 10.10.10.10 وجود داره از طریق برنامه ای مثل WinSCP آپلود کنید.بعد از آپلود کردن باید هاست رو با دستور زیر به حالت Maintenance ببرید.vim-cmd hostsvc/maintenance_mode_enter
و با دستور زیر بکاپ روی هاست بازگردانی میشه.vim-cmd hostsvc/firmware/restore_config /tmp/conادامه مطلب
برچسب:
نویسنده: مهسا حکیمی
http://speedcheck.ir https://speedtest.hiweb.ir https://www.speedtest.net/ https://fast.com/
برچسب:
نویسنده: مهسا حکیمی
Reading text global resources…Done reading text global resources link
برچسب:
نویسنده: مهسا حکیمی
Steps to fox
1> Open your default VM’s location , in my case:
C:UserserdaloDocumentsVirtual MachinesWindows 10x
2> Find and edit edit the .vmx file via simply open with Notepad
3> Within the document find replace the ” vmci0.present = “TRUE” value with “false”
4> Save the document
5 > Your VM should boot as usual
منبع
برچسب:
نویسنده: مهسا حکیمی